
To start off here are two almost identical memory photos, one is professional quality while the other is of amateur quality. Personally I don't care for the faded image backgrounds but for this example I decided to use the same basic style that inspired this post. You may or may not see the differences even after looking closely, don't worry I will point them out in just a bit.
All images in this post will enlarge when clicked on.
If you click on the enlarged view it will zoom in larger than print size causing some distortion.
If you click on the enlarged view it will zoom in larger than print size causing some distortion.
 |
| Sample #1 |
 |
| Sample #2 |
When choosing a memory collage artists it is important to find out how your photo will be printed once they have completed the design. Some artists print in house on an inkjet printer, while others use local or online quick labs. To achieve the highest quality you want your memory photo to be printed at a professional photography lab that chemically processes the photographs using archival quality products. This will ensure your memory photo has the longest possible life span and is the highest possible resolution print.
You do not want it printed on an inkjet or at a quick lab because:
1) Quick lab prints are printed at a much lower resolution and will not be as sharp as those done by a professional photo lab.
2) Both quick lab and inkjet prints fade faster than professionally processed photographs. Thus the life span is much shorter than a professional photograph. Ink jet prints can begin to fade in as few as five years. Some quick lab prints are not much better, starting to fade in as little as ten years.
I am glad to say the artist I observed does use a professional lab. I'm even pretty sure it is the same lab we use.
Now on to the workmanship. Don't let expensive canvas print samples or fancy framed samples trick you into thinking the artist is experienced or that they are superior quality.
Look very closely at samples of the artists' work.
1. If you will be having some or all of the subjects fully extracted from the original photograph as in the above samples, look closely at how the subject has been extracted.
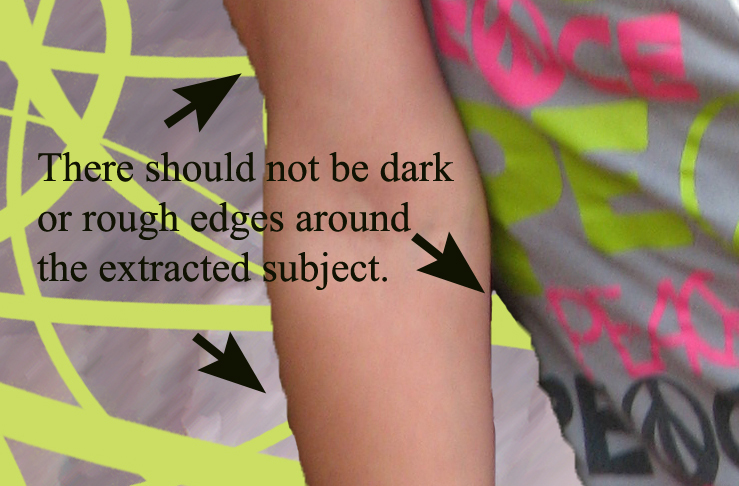 |
| zoom of sample #1 |
If the subject looks like the one above or has a dark smooth edge all the way around, it is a sure sign they have not learned the finer aspects of their craft.
 |
| zoom sample #2 |
2. Look closely at the different elements of the artwork on the samples, such as frames, fancy designs and any scrapbook style add-on. As for frames there are two things to look for, one is that photos should not extend past the edge of the frame even slightly. The second is that frames should not look like they have been painted or drawn on the flat photograph but should have some dimension to them.
With regard to fancy designs and scrapbook style add-on's it is harder to say what is good and what isn't because this is very subjective. While I prefer the look that is achieved by adding a bit of dimension to at least some of these elements you may not. However, I do want to point this out because if it is not present in any of the samples you are shown then it is most likely not something the artist is able to achieve. These next two samples will show a little of what I am talking about.


The next examples I would like to show you deal with collages in which multiple photographs are blended together to make your memory photo. The aforementioned artist had only two samples of what I would consider blended collages and in both samples I noticed three of the four most common errors made by beginning collage artists.

1st is cutting the subject out in an oval with a slightly feathered edge (top left) and placing it on the collage. While this is acceptable when it is part of the design asked for it is not a blended photo collage. 2nd is a sharp extraction of part of the subject. (top right) 3rd is erasing the outer edges with a feathered eraser but leaving an obvious transition between the top image and the background image. (bottom left and right) 4th is poor placement of images limiting ability to blend smoothly. (bottom right)

3. Make sure the artist will include ALL the photos you wish to be in the artwork not just the ones they want to use. Some artists will limit the number of photos because they personally think more than their limit doesn't look good. This is a personal opinion that you as the client should have the right to decide. The artist should let you know however if the quality or number of photographs you are submitting will reduce the overall quality of the finished artwork. They should also let you know how you can get the best quality using your choice of photographs, such as a larger print size or applying special photographic or image effects. Then they should let you decide on whether to included the photos or not. Take for example the center photo in all of the samples to this point. The photo is somewhat blurry, and while a sharper photo would look more like a professional portrait shot and add to the quality of the overall photo the little girls mother still wants that photo as the background. I did add some image effects to the photograph that slightly improved the blur, but only so much can be done to improve a blurry photo.
4. Make sure they will allow you to pick all the elements of your artwork if you should wish too, not just the general theme and color scheme, or in what room you plan to display the artwork. You may be thinking "I'm not an artist, shouldn't I let the artist decide?" I am not saying you should or have to tell them exactly how to do their job. But you should be allowed to say I would like this photo as the background and these ones put in frames or blended or the little girl taken completely out of this photo, or if you want swirls or other added elements. The artist I observed is like many I have seen on line that give the client only minimal say in the overall design of the finished artwork.
These are YOUR MEMORIES and so should reflect YOUR STYLE not the artists' style, unless of course you happen to love the artists' style. To accomplish this the artist should be willing to consult with you about the overall design of your memory photo. And to ensure your satisfaction the artist should provide you with a proof (either print or digital) and be willing to make at least one change if not more to that proof without additional charges before printing your artwork.
Most memory collage artists' offer only one or maybe two styles of designs and if you know what different styles are available and you like the style they offer then that is great. However, it is good to know what other styles are possible so you can decide which meets your needs best.
To make the styles easier to distinguish between we have created samples using the six basic styles we offer at Artistix Network LLC. A memory photo can be all of one style or can incorporate a number of different styles.


There is one more style I would like to share because although I consider it a blended collage it looks quite different from the traditional blended collages. In this type of blended composite photographic collage some or all of the photographs are merged together as if a double exposure has occurred.

There are many digital collage artists both locally and on line that do beautiful professional high quality work. However, there are many more who produce only amateur quality work and try to pass it off as high quality. It is my hope that this information will help families and individuals seeking to create a memory photo get a long lasting high quality photo.
I want to thank you for sticking with me through this long post. I considered making it a two part post but breaking the information up just didn't feel right. If you have any questions or need help with a memory photo I am here to help.
I want to thank you for sticking with me through this long post. I considered making it a two part post but breaking the information up just didn't feel right. If you have any questions or need help with a memory photo I am here to help.
If you have found this information helpful and informative please share this with others.


